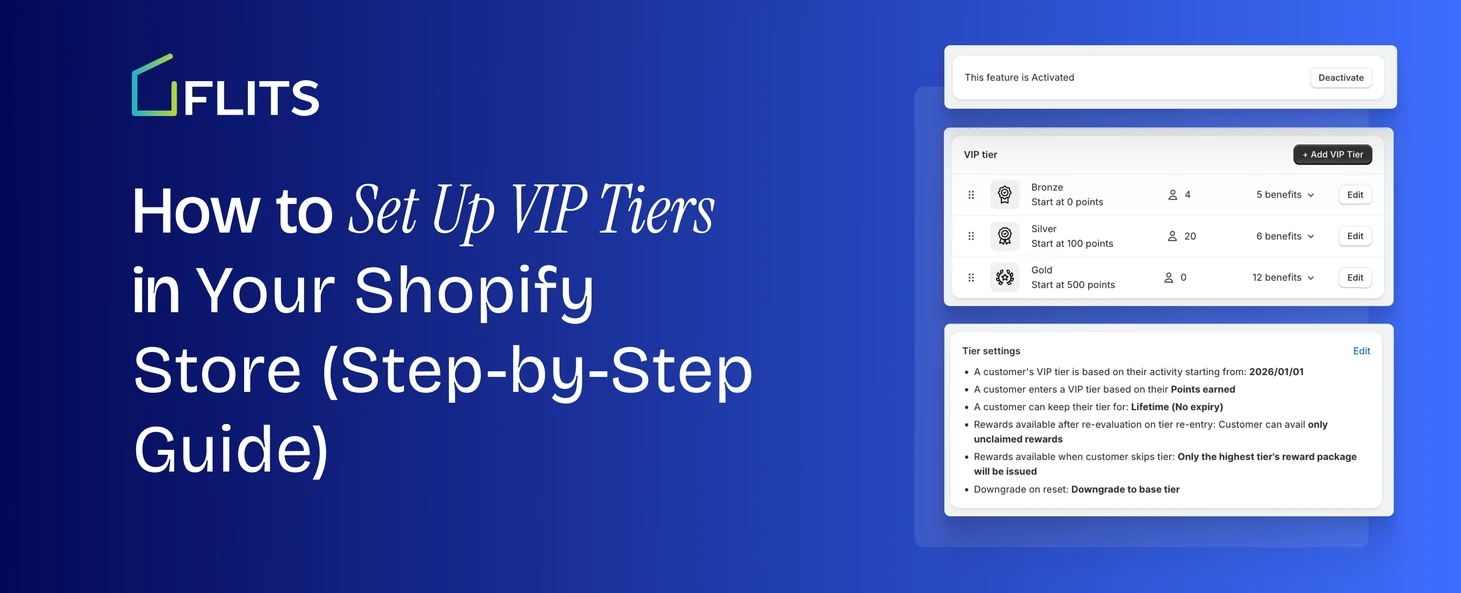
A customer who spends a hundred dollars every month and a customer who comes back to spend fifty dollars every three months are not the same kind of customer. A VIP tier program is how you tell them apart and reward the difference. You group customers into levels based on how much they spend, then give each level better perks. This guide walks through the complete VIP tier setup in Flits loyalty program, from turning the feature on to building out your first tier.
What is a VIP Tier Program?
A VIP tier program sorts your customers into levels, often called things like Bronze, Silver, and Gold, based on how much they spend or how often they shop with you. Each level unlocks its own set of perks. The more a customer spends, the higher they climb, and the better their rewards get.
It's different from a standard points-based loyalty program. Points reward every purchase the same way. Tiers reward status. A customer in your top tier should feel like they're getting something the average shopper doesn't get, whether that's early access to new products, free shipping, or a bigger discount.
Why VIP Tiers are worth setting up?
Most stores lose more revenue to customers who quietly stop buying than to any single bad review or refund. A VIP program gives your best customers a reason to keep choosing you over a competitor, because leaving means losing status they've already earned.
It also solves a real problem for shoppers, not just for your store. People want to feel recognized when they've spent real money with a brand. A generic "thanks for your order" email doesn't do that. A tier badge, a birthday perk, or early access to a sale does.
You don't need thousands of customers to make this work either. Even a small store can build three tiers around its top 20% of buyers and see those customers spend more to reach or keep their status.
How to Set Up VIP Tiers in Flits
Here's the full process, step by step, based on the Flits admin panel.
Step 1: Open the Loyalty Program Settings
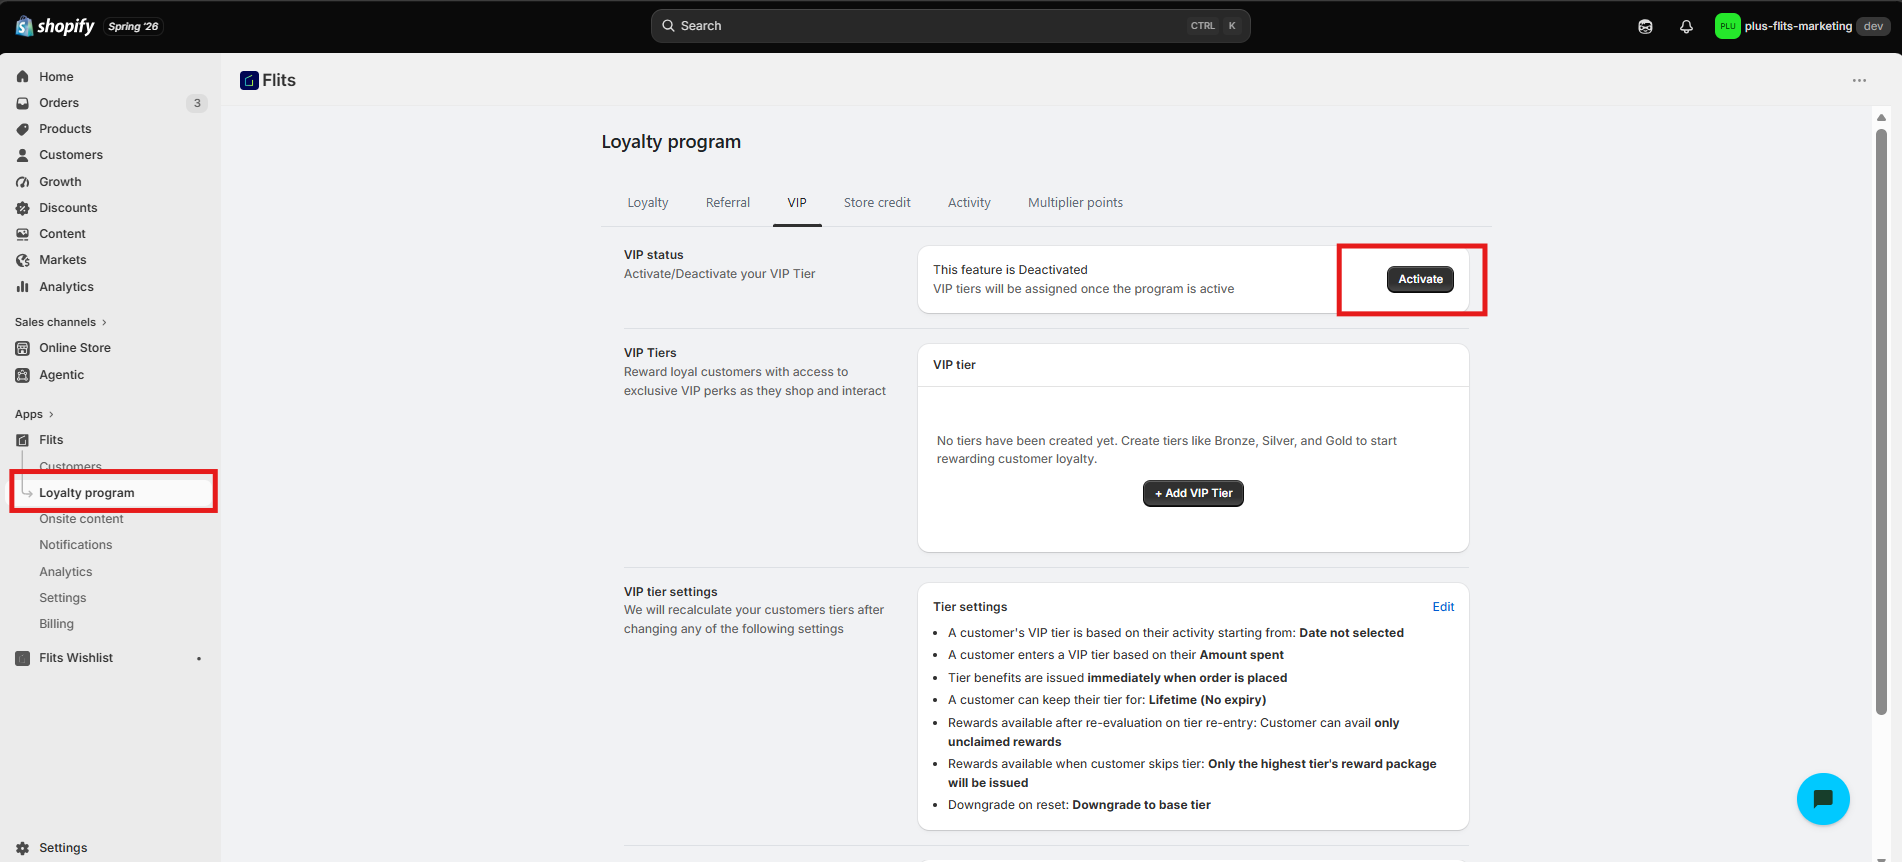
From your Shopify admin, go to Apps > Flits > Loyalty program. You'll see several tabs across the top: Loyalty, Referral, VIP, Store credit, Activity, and Multiplier points. Click VIP.
Step 2: Set Your Tier Criteria First
Before you activate anything or add a tier, work through the Tier settings panel and click EDIT. Getting these decisions right first means you won’t have to rebuild your tiers around a different setup later.

1. Program start date
This is the one setting you can’t skip. You cannot activate the VIP feature until a start dat is selected, since every tier calculation runs off this date. It has to fall between the start of the current calendar year and today.
2. Tiers calculation
Choose what customer activity counts toward a tier: points earned, amount spent, number of orders, or a combination. You can pick up to two options at once, and Flits combines them using AND/OR logic, with AND applied by default.
3. When to assign a tier
Set which order status triggers tier assignment (Placed, by default) and whether there’s a delay before tier is issued. Keep the delay at 0 days if you want rewards to go out right when the order status trigger happens.
This setting only applies to the “amount spent” and “number of orders” calculation methods.
4. Program reset settings
Decide how long a tier lasts once a customer earns it. You can keep it active until the following calendar year, make it a rolling 12 months from the date it was earned, or set no expiry at all so the tier is permanent unless a purchase gets refunded.
5. Rewards after re-entry
If a customer downgrades and later re-enters a tier, decide whether they get every reward again, only the ones they haven’t claimed yet, or none at all. Custom perks aren’t affected by this setting either way.
6. Reward on tier skip
If a customer jumps straight from Bronze to Gold, choose whether they only get Gold’s rewards or the rewards from every tier they skipped over.
7. Downgrade on reset
If a customer’s status drops, decide whether they fall all the way back to your base tier, drop down just one tier, or land wherever their current activity actually puts them.
These settings shape how the whole VIP loyalty program behaves, so it’s worth deciding on them before you activate or build a single tier.
Step 3: Create Your First Tier
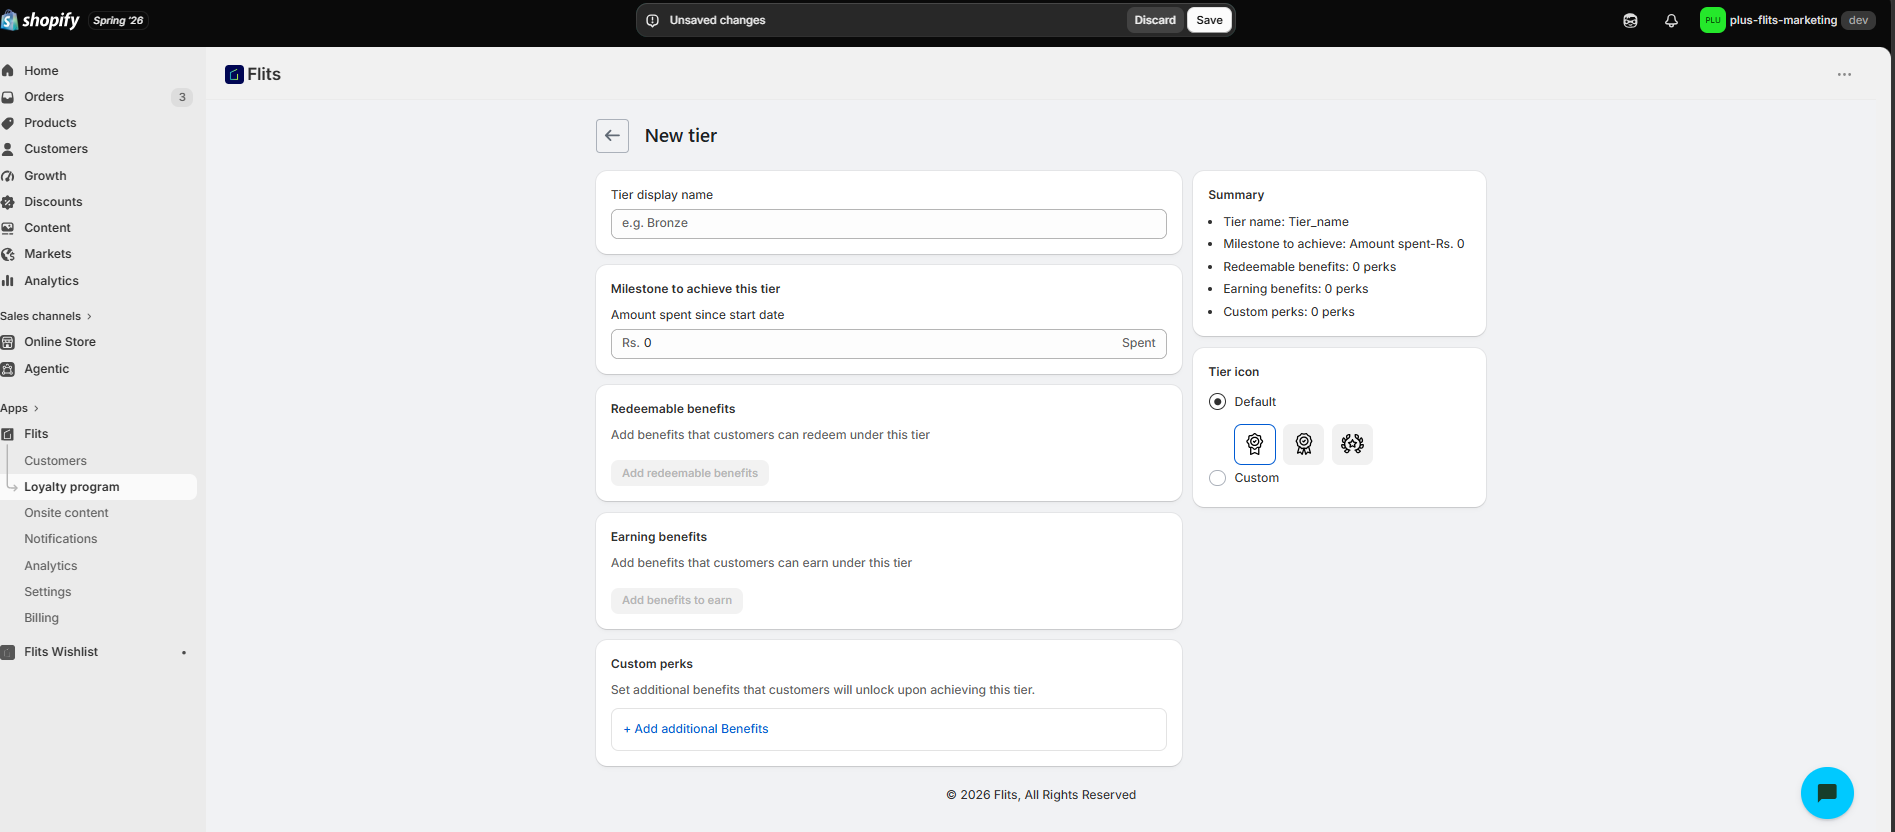
Under VIP Tiers, click + Add VIP Tier. This opens a form for a new tier with a few fields to fill in:
- Tier display name
This is what customers will see, so keep it simple. Bronze, Silver, and Gold work well because shoppers already understand the hierarchy without you explaining it.
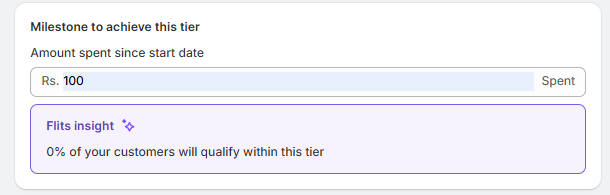
- Milestone to achieve this tier
This is the target a customer needs to hit, based on whichever calculation method you chose in Step 2, to unlock the tier.
As you type in an amount, Flits shows a live insight below the field telling you what percentage of your current customers would already qualify. This is useful for sanity-checking your thresholds.
If you set the bar too high and 0% of your customers qualify, nobody will ever see the reward, which defeats the purpose.
- Redeemable benefits
These are perks a customer can actively redeem once they're in the tier, like a discount code or a free product. Note that these stay locked on your first tier and only become available starting with your second one; more on that in the next step.

- Earning benefits
These are perks tied to how the customer earns while in the tier, such as bonus points on every purchase. Flits gives you a set of triggers to choose from here:
- Placing an order
- A birthday
- Points on a referral’s orders
- Points for inviting someone
- Multiplier points
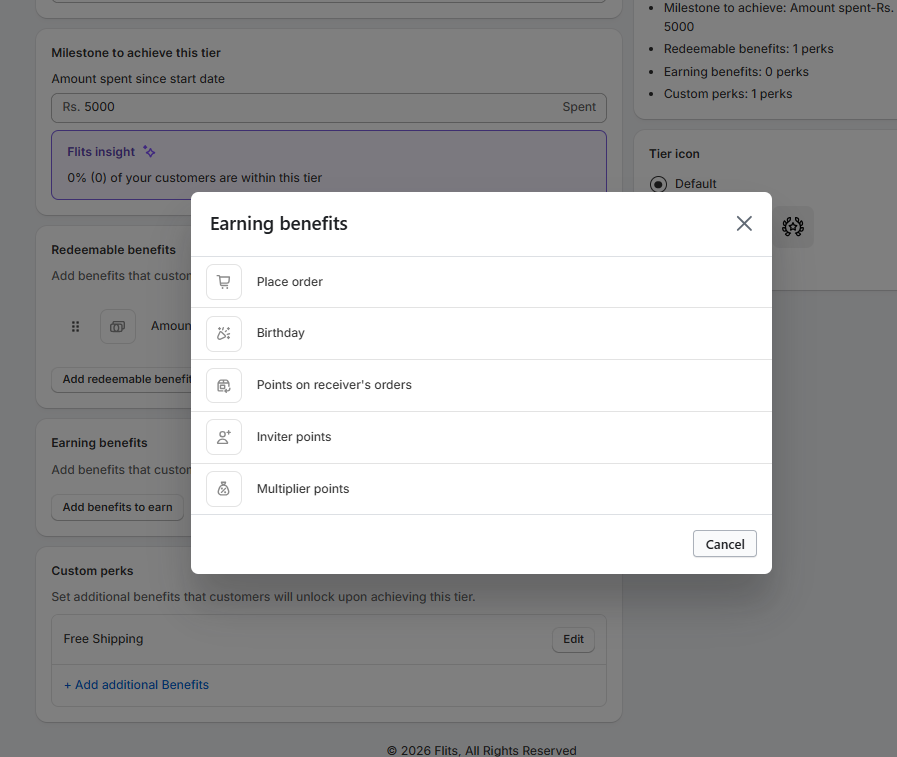
Pick whichever ones fit how you want this tier to reward activity.
- Custom perks
If you want to offer something that doesn't fit neatly into redeemable or earning benefits, like early access to new drops or a dedicated support line, add it here under "Custom rewards name."
- Tier icon
Choose one of the default icons or upload a custom one. This icon shows up wherever the tier is displayed to customers, so pick something that visually separates each tier from the next.

Once the fields are filled in, check the Summary panel on the right. It shows you the tier name, the milestone, and how many benefits you've added, so you can confirm everything is right before saving.
There’s also a VIP tier preview that shows roughly how your tiers will look to customers, spend threshold and all, so you can catch anything that looks off before it goes live.

Step 4: Repeat for Additional Tiers
Most stores run with two to four tiers. Go back to VIP Tiers and click +Add VIP Tier again for each additional level. Keep the spending gap between tiers meaningful.
If Bronze starts right after a customer’s first purchase and Silver only asks for a little more, customers won’t feel like their working toward anything.
One detail worth knowing: the Redeemable benefits and Earning benefits sections stay locked on your very first tier. Once that first tier is saved, those sections open up on your second tier onward, so you can add things like discount codes or bonus points from there.
Step 5: Check Tier Status (Optional)
Flits recalculates customer tiers automatically whenever you change a setting, so you don’t need to do anything extra for it to take effect.

If you want visual confirmation a change has gone through, there's a status check panel with a recalculate button you can click for peace of mind. It’s there as a manual option, not a required step.
Step 6: Activate the VIP Feature
Now is the time to finally activate your VIP feature.
By default, VIP status shows as Deactivated. Before your tiers go live, you need to flip this on. Click Activate next to "This feature is Deactivated."
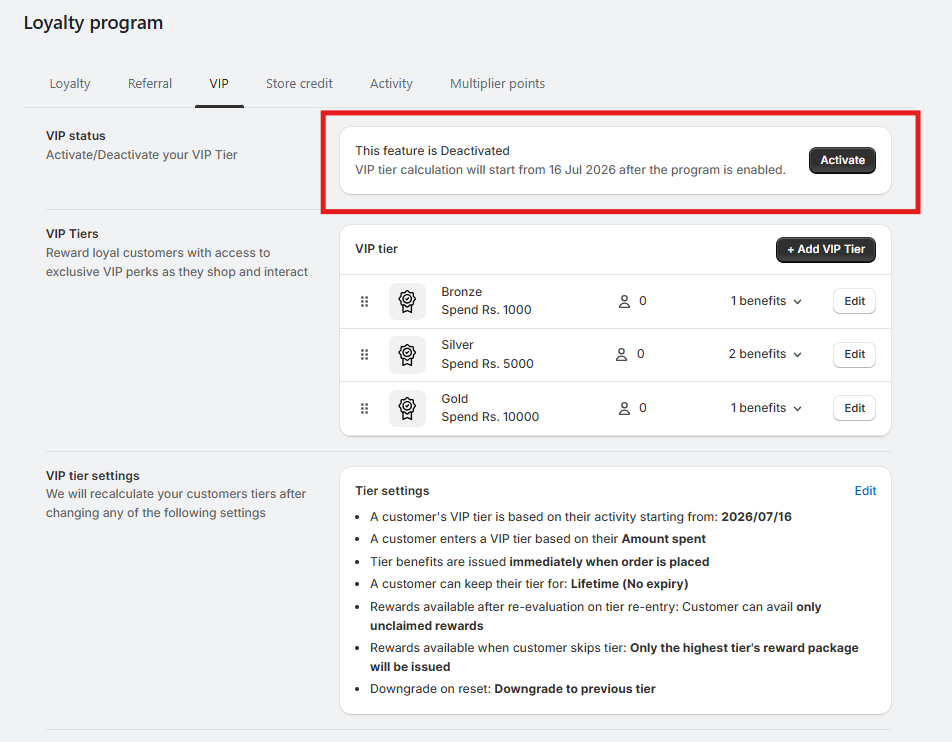
One thing worth knowing before you click Save: To save the activation, you have to create at least one tier. If you try to save first, you'll see a warning banner that says "Create at least one VIP tier." So move straight to building your first tier before activating.
Step 7: Save and Launch
Once your tiers and settings are in place, hit Save. Your VIP program is now live, and Flits will start recalculating customer tiers automatically based on the rules you've set.

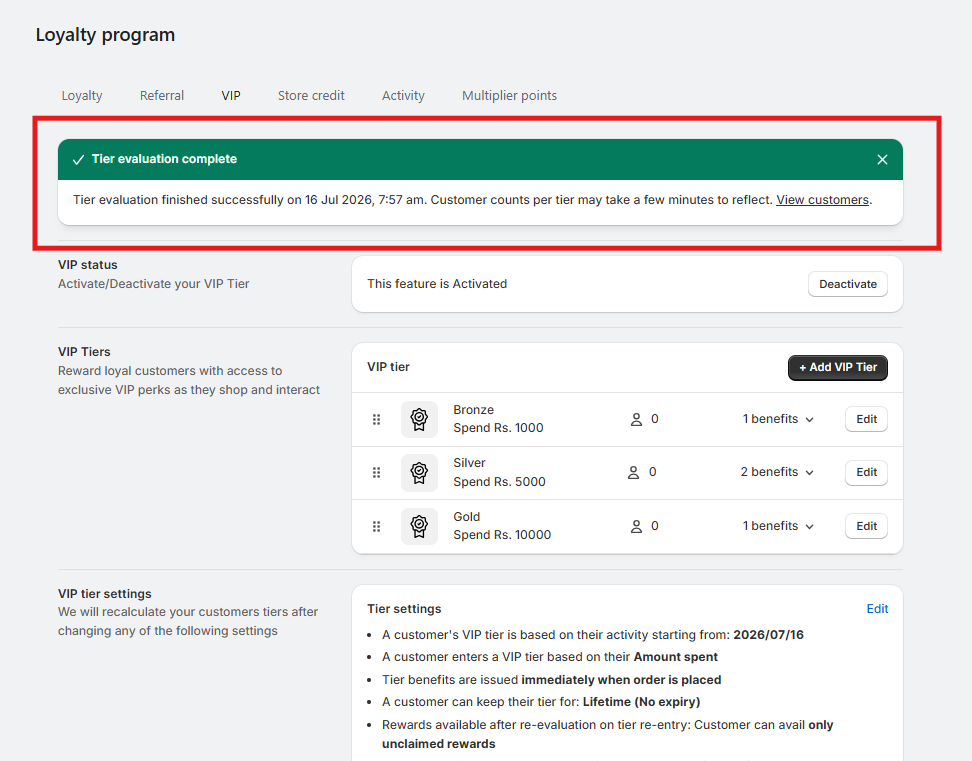
And there, your VIP tier is finally live.
Example Tier Structures
If you’re not sure where to set your thresholds, here are a few starting points based on common store setups.
Simple three-tier structure
- Bronze: entry level, free for anyone who makes their first purchase, gets a small discount on the next order
- Silver: unlocked after a moderate spend threshold, adds free shipping and early access to sales
- Gold: reserved for your top spenders, adds a bigger discount, a dedicated perk like a free gift on every order, and first access to new product launches
Four-tier structure
- Starter: welcome tier for new customers
- Bronze: light repeat buyers
- Silver: consistent, regular customers
- Gold: your highest spenders, the ones you'd genuinely miss if they left
Whatever structure you choose, set your thresholds using the qualification insight in Flits so you know roughly how many customers land in each tier before you launch.
Set Up Your First VIP Tier Today
A VIP tier program doesn’t need to be complicated to work. Start with two or three tiers, set thresholds that actually match your customer base, and give your top spenders a reason to keep choosing you. If you’re using Flits, the whole setup takes a few minutes from within your Shopify admin. If you're still on the fence, book a demo with us today!
Frequently Asked Questions
1. How many VIP tiers should a Shopify store have?
Most stores do well with two to four tiers. Fewer than that and the program feels flat. More than that and customers lose track of what they're working toward.
2. Is a VIP tier program different from a points-based loyalty program?
Yes. Points reward every transaction equally. Tiers reward status and give customers something to climb toward, which tends to drive more repeat purchases from your highest-value shoppers.
3. What perks work best for VIP customers?
Free shipping, early access to sales or new products, exclusive discounts, and small surprise gifts tend to perform well. The best perks feel earned, not generic.
4. Do customers lose their VIP status if they stop spending?
That depends on how you configure the downgrade setting. You can choose to keep customers at their tier for life, or have them drop back to a base tier if their spending slows down.
5. Can VIP tiers be based on something other than amount spent?
Yes. Amount spent is the most common qualifying metric, but Flits also lets you set tiers based on points earned or number of orders, and you can combine rules with AND/OR logic if you want a tier to depend on more than one condition.